
Are you tired of staring at those old, outdated appliances in your kitchen? Do you cringe every time you see that worn-out oven or that rusty refrigerator? Well, don’t rush to the appliance store just yet! There’s a budget-friendly, creative solution that can breathe new life into your kitchen – DIY appliance painting. In this comprehensive guide, we’ll walk you through the ins and outs of giving your appliances a fresh, cost-effective makeover. So, let’s roll up our sleeves and dive into the world of appliance transformation!
Why Consider DIY Appliance Painting?
Question: Why should you even consider painting your appliances?
Answer: Painting your appliances can be a game-changer for your kitchen’s aesthetics and your wallet. It’s a savvy way to revamp your space without breaking the bank. Plus, it’s a fun, hands-on project that even DIY beginners can tackle with confidence.
The Benefits of DIY Appliance Painting
Let’s break down the advantages of opting for this budget-friendly makeover:
- Cost-Efficient: New appliances can burn a hole in your pocket. DIY painting allows you to achieve a fresh look at a fraction of the cost.
- Customization: You have full creative control. Choose the colors and designs that match your kitchen’s style.
- Eco-Friendly: Repurposing your old appliances is an environmentally responsible choice, reducing waste.
- Quick Transformation: You’ll be amazed at how quickly a coat of paint can rejuvenate your kitchen’s ambiance.
- Sense of Accomplishment: Completing a DIY project brings a unique sense of satisfaction.
- Increased Property Value: A well-executed appliance makeover can enhance your home’s overall value, making it more appealing to potential buyers.
- Unlimited Style Options: From modern and sleek to retro and vintage, the possibilities are endless when it comes to choosing your appliance’s new look.
Preparing for Your Appliance Makeover
Question: Where should you start your appliance painting journey?
Answer: Preparation is the key! Get your ducks in a row before you dive into the paint cans.
Supplies You’ll Need
To make your appliance painting adventure as smooth as possible, gather these essential supplies:
| Supplies | Description |
| Appliance paint | Special paint designed for appliances. |
| Primer | Ensures paint adheres to the surface. |
| Sandpaper | To smooth out any imperfections. |
| Painter’s tape | Protects areas you don’t want to paint. |
| Drop cloths | Safeguards your kitchen from splatters. |
| Screwdriver | For removing handles or other hardware. |
| Cleaning supplies | To thoroughly clean the appliance. |
| Respirator mask | Ensures safety when working with paint. |
| Brushes or rollers | For applying paint evenly. |
| Clear coat (optional) | Provides extra protection and sheen. |
Steps to Prep Your Appliances
- Clean Thoroughly: Start by giving your appliances a good scrubbing. Any dirt or grease will make it challenging for the paint to adhere.
- Remove Hardware: Take off any removable hardware like handles, knobs, or hinges. This ensures an even application of paint.
- Sand It Down: Lightly sand the surface to create a better bond between the paint and the appliance. Remember, a little roughness goes a long way.
- Apply Primer: A layer of primer helps the paint stick and ensures a smoother finish.
- Protect Surroundings: Cover your kitchen with drop cloths to avoid any accidental splatters.
- Consider Ventilation: Adequate ventilation is crucial when working with paint. Open windows or use fans to ensure good airflow.
With your appliances prepped and your supplies ready, you’re all set to dive into the colorful world of appliance painting!
Choosing the Right Appliance Paint
Question: What’s the best paint for your appliance makeover?
Answer: Not all paints are created equal, especially when it comes to appliances. It’s essential to choose the right paint that can withstand the wear and tear of kitchen life.
Types of Appliance Paint
- Epoxy Paint: This is the go-to choice for most DIYers. It’s known for its durability and heat resistance. Plus, it comes in various colors, making customization a breeze.
- Heat-Resistant Spray Paint: Ideal for stovetops and grills, this paint can withstand high temperatures without blistering or fading.
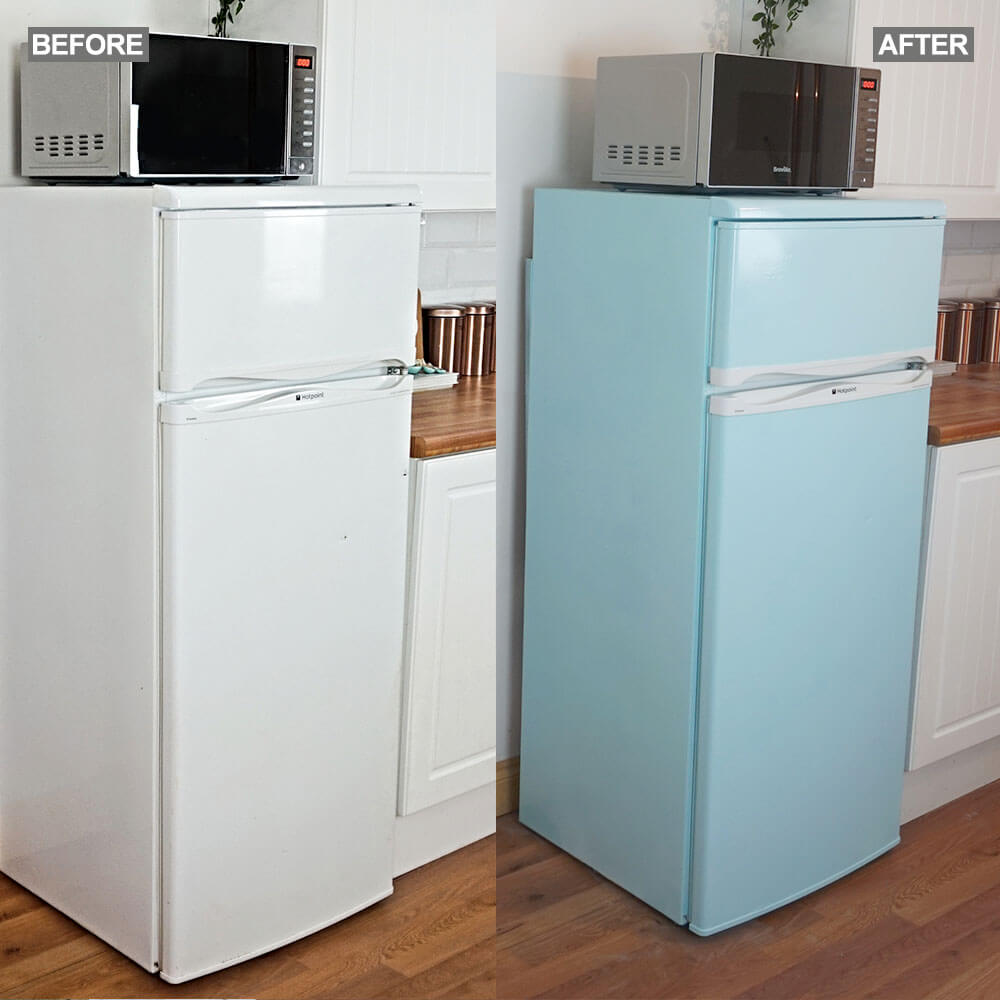
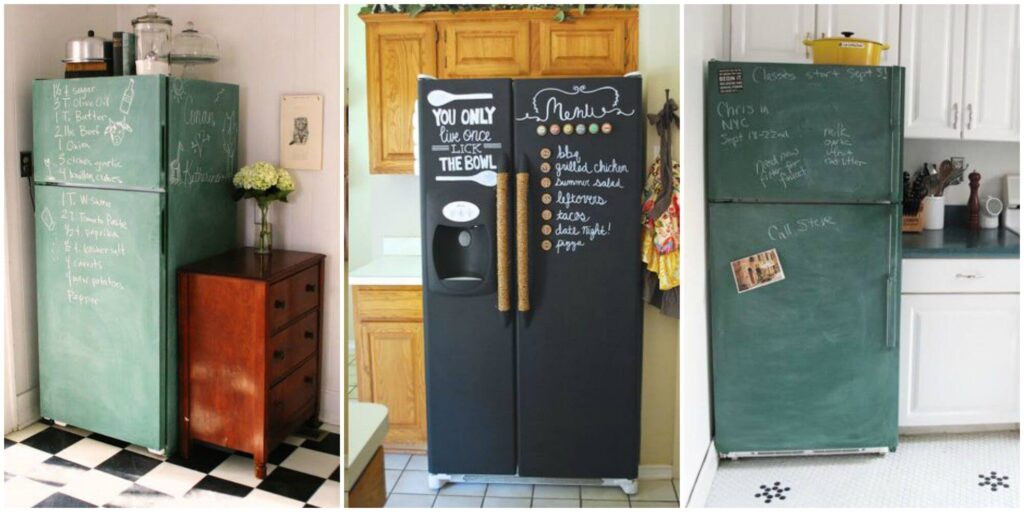
- Chalkboard Paint: Perfect for your fridge, this unique paint lets you turn your appliance into a fun chalkboard for notes and doodles.
- Stainless Steel Paint: If you want that sleek stainless steel look, this paint can give your appliance a modern makeover.
- Liquid Stainless Steel: For a more authentic stainless steel appearance, this liquid paint mimics the real deal.
- Enamel Paint: Ideal for achieving a glossy, polished finish on your appliances. It provides a sleek, modern look.
- Appliance-Specific Paint: Some brands offer paint specifically designed for certain appliance types, ensuring a perfect match for your needs.
Painting Your Appliances Like a Pro
Question: How can you ensure a professional finish on your appliances?
Answer: With the right techniques, you’ll have your appliances looking brand new.
Steps for a Flawless Finish
- Apply Thin Coats: Thin, even coats of paint are the secret to a smooth finish. Avoid glopping it on too thick.
- Brush or Roll: Depending on the size and shape of your appliance, use a brush or roller for an even application.
- Let It Dry: Patience is key. Allow each coat to dry thoroughly before adding another layer. This prevents drips and unevenness.
- Add a Clear Coat (Optional): For extra protection and shine, consider applying a clear coat over the paint once it’s dry.
- Reattach Hardware: After the final coat has dried, reattach handles and other hardware. Make sure they’re properly aligned.
- Post-Painting Cleaning: After completing the painting process, it’s important to clean your brushes and rollers properly to extend their lifespan and maintain their quality for future projects.
Troubleshooting Common Painting Problems
Question: What do you do when things don’t go as planned?
Answer: DIY projects don’t always run smoothly. Here’s how to tackle some common painting hiccups:
Problem: Paint Bubbles
Solution: If you notice bubbles forming as the paint dries, gently sand the affected area and repaint it.
Problem: Uneven Finish
Solution: Sand the surface lightly and apply an additional coat of paint. Remember, thin layers are your best friend.
Problem: Drips and Runs
Solution: Sand down the drips, reapply paint, and let it dry thoroughly. Don’t rush this step.
Problem: Paint Doesn’t Adhere
Solution: Make sure your appliance is clean, and you’ve used the right primer. If necessary, sand it down and try the primer again.
Problem: Color Doesn’t Match Expectations
Solution: It’s not uncommon for paint colors to appear slightly different when dry. Before you start, test a small area or use paint samples to ensure the color meets your expectations.
Adding Personal Flair to Your Appliances
Question: How can you make your appliances truly unique?
Answer: It’s time to get creative! Personalize your appliances to match your kitchen’s style and your personality.
Ideas for Personalization
- Color Combinations: Experiment with bold or subtle color combinations to create a unique aesthetic that sets your kitchen apart.
- Stencils and Decals: Use stencils or decals to add patterns or designs. Think floral motifs, geometric shapes, or your favorite quotes.
- Chalkboard Surfaces: Turn your fridge into a canvas for family messages, shopping lists, or daily doodles.
- Faux Stainless Steel Accents: Apply stainless steel paint to specific areas for a modern, industrial look.
- Vintage Vibes: Go for a retro look by adding some classic detailing like chrome accents.
- Texture Play: Try various painting techniques like sponge painting, rag rolling, or even using a wood grain tool to give your appliances a unique texture.
Caring for Your Newly Painted Appliances
Question: How can you maintain the freshly painted look?
Answer: To keep your appliances looking fabulous for the long haul, follow these maintenance tips:
Maintenance Steps
- Gentle Cleaning: Use a soft, damp cloth and mild dish soap to clean your appliances. Avoid abrasive cleaners that can damage the paint.
- Handle with Care: Treat your painted appliances with the same care you would any high-end appliance. Avoid unnecessary bumps or scratches.
- Prompt Repairs: If you notice any chipping or damage to the paint, address it promptly to prevent further issues.
- Regular Inspections: Periodically inspect your painted appliances for signs of wear and tear, and touch up any problem areas.
- Long-Term Touch-Ups: Over time, it’s possible that your appliances may show signs of wear. When this happens, simply touch up any scuffs or scratches to keep them looking their best.
Show Off Your DIY Appliance Makeover
Question: What’s left to do once your appliances are painted to perfection?
Answer: Share your success and enjoy your transformed kitchen!
Share Your Success
- Throw a Kitchen Reveal Party: Invite friends and family to admire your handiwork and enjoy a home-cooked meal in your revamped kitchen.
- Post Before-and-After Photos: Share your stunning transformation on social media to inspire others to embark on their own appliance painting journey.
- Bask in the Glow: Revel in the feeling of accomplishment every time you step into your kitchen.
- Help Others: Share your experience and knowledge with others looking to undertake a similar project. Your tips and insights could be invaluable to them.
- Consider More DIY Projects: Once you’ve conquered appliance painting, who knows what other DIY projects you might be inspired to tackle?
In conclusion, DIY appliance painting is a cost-effective way to give your kitchen a much-needed facelift. It’s a budget-friendly, eco-conscious, and fun project that lets you flex your creative muscles. By following the right steps and techniques, you can achieve a professional-looking finish that’s sure to impress. So, why not add a splash of color to your kitchen and make your appliances the stars of the show? Happy painting! Your kitchen makeover journey has just begun.
Frequently Asked Questions (FAQ) about DIY Appliance Painting
In this FAQ section, we address some common questions and concerns related to the DIY appliance painting process. Whether you’re a beginner or an experienced DIY enthusiast, these answers will provide you with valuable insights into successfully transforming your appliances.
1. Is DIY appliance painting cost-effective?
Absolutely! DIY appliance painting is a budget-friendly alternative to purchasing new appliances. It allows you to achieve a fresh look at a fraction of the cost. You’ll be amazed at the transformation you can achieve without breaking the bank.
2. Do I need any special skills to paint my appliances?
Not at all. DIY appliance painting is a beginner-friendly project. With proper preparation and the right supplies, anyone can achieve professional-looking results. Just follow the step-by-step guide in our article to get started.
3. What supplies do I need for appliance painting?
You’ll need specific supplies for appliance painting, including appliance paint, primer, sandpaper, painter’s tape, drop cloths, screwdriver, cleaning supplies, respirator mask, brushes or rollers, and clear coat (optional). These essentials ensure a smooth and successful painting process.
4. Can I paint any type of appliance?
Yes, you can paint various types of appliances, including refrigerators, ovens, stovetops, dishwashers, and more. Just make sure to choose the right type of paint and follow the preparation steps outlined in our article for the best results.
5. How do I choose the right appliance paint color?
Choosing the right paint color is a matter of personal preference. Consider your kitchen’s style and color scheme. It’s a great opportunity to add a pop of color or maintain a classic look. Some DIY enthusiasts even opt for unique patterns, textures, or chalkboard finishes.
6. What type of paint is best for appliances?
Epoxy paint is the most commonly used type for appliance painting. It’s known for its durability, heat resistance, and the variety of colors available. However, you can also use heat-resistant spray paint for specific appliances like stovetops or grills.
7. How long does the appliance painting process take?
The duration of the project depends on the size of your appliance and the number of coats you apply. On average, it takes about a day for cleaning, prepping, painting, and drying between coats. You can expect the entire process to be completed in a weekend.
8. How do I maintain my newly painted appliances?
Maintaining your painted appliances is easy. Clean them gently with a soft, damp cloth and mild dish soap. Avoid abrasive cleaners that can damage the paint. Handle them with care, and address any chips or damage promptly. Periodically inspect for wear and touch up problem areas.
9. Can I repaint my appliances if I change my kitchen’s style?
Yes, you can repaint your appliances to match your kitchen’s evolving style. Simply follow the same preparation and painting steps outlined in our article. Painting over existing paint is possible, but you might need to sand it down and apply primer if you’re making significant color changes.
10. What should I do if I encounter painting problems like bubbles, drips, or uneven finishes?
Our article provides troubleshooting solutions for common painting problems. If you encounter bubbles, gently sand the affected area and repaint it. For drips or runs, sand them down, reapply paint, and ensure proper drying. Uneven finishes can be addressed by sanding and applying additional coats.